Hair & Make-Up
Make your hair an accessory
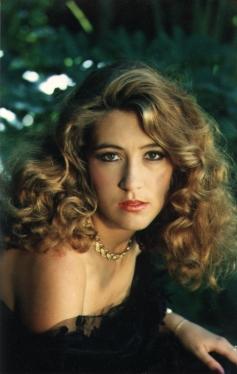
 Supermodels change their hair color as often as their clothes. And now models have started a trend for accessorizing clothes
with hair color. Linda Evangelista is top of the list for her chameleon-like ability to change her looks. Linda who has changed
her hair color 12 times in five years, says that dyeing her hair gives her an emotional lift.
Supermodels change their hair color as often as their clothes. And now models have started a trend for accessorizing clothes
with hair color. Linda Evangelista is top of the list for her chameleon-like ability to change her looks. Linda who has changed
her hair color 12 times in five years, says that dyeing her hair gives her an emotional lift.
So before the winter blues set-in and the party season begins, why not change your hair color and let everyone see that you have a
headstart on fashion.
There are lots of preparations that are inexpensive and easy to use in the shops now. You can enhance your natural color or be a
bit more daring with a completely new look.
One of the simplest and quickest ways to apply color is a colored mousse. These mousses are used just like a styling mousse, applied
straight from the can and wash out with your next hair wash.
If you are nervous about coloring your hair or not sure which home colorants to use, then a color-enhancing shampoo might
be the answer. The color progressively increases with each application, so that after a few shampoos your hair will be highlighted
with subtle hints of color.
 Choose the product you use carefully, keeping in mind that a new hair color can be as temporary or as permanent as you wish. If you
only want a new color for a special date, you can use wash-in wash-out shades which will enhance your hair and give it a high gloss.
For longer lasting, deeper color, a semi-permanent color allows you to be experimental. Coloring shampoos are easy and will wash
out gradually in about six weeks and you can then renew or change the color of you hair again.
Choose the product you use carefully, keeping in mind that a new hair color can be as temporary or as permanent as you wish. If you
only want a new color for a special date, you can use wash-in wash-out shades which will enhance your hair and give it a high gloss.
For longer lasting, deeper color, a semi-permanent color allows you to be experimental. Coloring shampoos are easy and will wash
out gradually in about six weeks and you can then renew or change the color of you hair again.
If you've definitely decided to go with a color, you can use a permanent colorant which will also blend in any stray grey hairs
you may have. You have to be quite sure about the color you have chosen before going permanent because they do now wash-out;
they have to grow-out, and roots will need retouching after about six weeks.
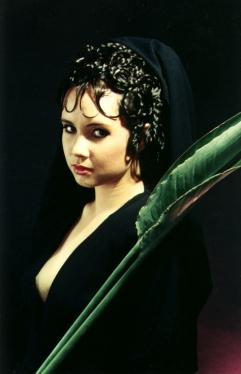
The main hair color story for autumn is red. Ranging from fiery red to orange-red in shades of conker, rosehip, russet, cayenne
and mahogany.
Consider your complexion when choosing a new hair color -- if you have a cool skin tone then mahogany shades will look good on you.
If you have a warm skin tone you will need a shade like conker, amber, chilli or a warm rich brown. Colors that most people can
wear are auburn or a rich chestnut shade.
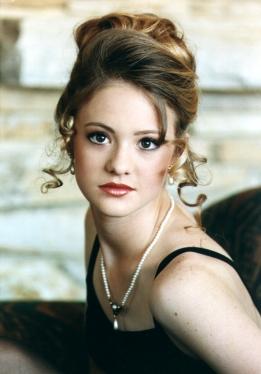
When you've achieved your new color you may want to think about a new hairstyle. With retro revival come the sharp, blunt-cut bobs
of the 60's and the 40's classical waves, pincurls and french rolls. Whichever way you style your hair a high gloss finish is a must.
To Sum It Up
- Use a color-enhancing shampoo which adds glossy tones to natural hair and brightens existing color on tinted hair.
- Consider your natural hair color before choosing a new color. The longer you leave a color in to develop, the more vibrant
the result.
- Try longer lasting semi-permanent color which takes longer to fade than an ordinary semi.
- Consider the texture of your hair and your skin tone.
- For extra vibrancy, apply color to highlighted or pre-lightened hair.
- Always use a reputable product.
- Use a shine-enhancing product to accentuate and add luster, an absolute essential for this season's glamour look.
- Buy the right product for your needs - wash-out, semi-permanent or permanent.
- Do a strand test.
- Read and follow the manufacturer's instructions carefully.
Make-Up
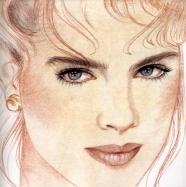 Step 1: "Must Have" Products
- Concealer
: When choosing a concealer that’s right for you, look for a brand that offers a wide range of shades and provides undetectable coverage, and blends easily for a natural look. Pick one in a clear tube so you know exactly what shade you’re buying.
- Foundation:
The bright lights of a photo-shoot necessitate the right foundation to create a natural-looking finish. This also applies to everyday make-up as well, so you need a foundation that’s right for your skin type. Many folks have combination skin, so try to choose a foundation that helps balance the dry and oily areas for a consistent, even finish.
- Sponges:
Using sponges to apply make-up can be considered one of the tricks of the trade. They’re a must for blending concealer and foundation because they spread the product evenly, ensuring the best possible coverage.
- Blush:
Blush is the quickest and easiest way to balance and brighten the face with color. Finding a blush that blends well is key. Find a product that’s easy to blend and provides a wide color range for sheer, natural coverage.
- Mascara:
The mascara brush is extremely important, as it has to lift and separate the lashes while applying the mascara. A crisscross brush can do this, stretching the lashes to their limit by applying the formula from base to tips of the la
shes.
- Lipstick:
Long lasting lipstick formulations can be a blessing in many situations, especially on photo shoots or situations where re-applying is a hassle. Use one which moisturizes and conditions as well as coloring.
Step 2: How To Choose The Right Shades
How do you figure the right color palette for yourself? It doesn’t have to be confusing; follow these simple guidelines:
Foundation and Concealer Shades
- Go to the store with a naked face (no foundation) and test shades on face and neck.
- Pick a shade closest to your natural complexion. You’ll know this because the right shade should blend in so well it almost disappears on your skin. (Most women should try to balance skin with a yellow-tone foundation shade.)
- Stay away from a light shade that can wash out your complexion or too dark a shade that’s easily detectable. (Use a tinted powder if you desire more color.)
- Select a concealer shade one shade lighter than your foundation to brighten the eye area. Never go too light because the dark circles will show through.
Eyebrow Shades
- If you never wear eyeshadow, try a neutral rose-tone shad over the entire eye to help brighten your eyes.
- If you always wear matte browns, try a brown with a shimmer, or even try a plum or burgundy-tone shadow.
- To help define eyes, use a dark shade of shadow along the crease and lash line.
- Most women can wear any shade of eyeshadow if blended correctly, but stay away from wearing the same shade as your eye color.
- If you use a neutral-tone shadow, try mixing a slightly darker shade at crease.


Lipstick Shades
- Lip color balances the rest of your make-up, so you should always consider wearing it.
- Choose shades that complement your clothes and hair color. If you usually don’t wear lipstick, opt for natural shades that are quick and easy to apply.
- Bright colors are the hardest to wear. If you like them, try sheer versions that give a tint of color to lips.
- Experiment! Don’t be afraid to mix lip colors to find a perfect shade.
Step 3: Selecting The Right Make-Up Tools
The first thing a make-up artist learns is that the right tools are essential when applying and blending make-up. It’s the difference between okay make-up and perfect make-up.
Tools Right At Your Fingertips
Line lips with High Definition Lip Definer, then use the opposite end to apply and blend lip color with brush tip.
Line eyes with High Definition liner, then soften line with attached
smudger tip.
Apply and blend eyeshadow with compact sponge applicator tip available
in all High Definition Eyeshadow.
Lengthen and separate lashes with STRETCH Mascara’s crisscross brush.
Groom and set brown with the brush.
Apply and blend Silk Perfection Liquid to Powder make-up with custom
sponge that comes with compact.
The Importance of Blending
The importance of blending make-up can’t be overemphasized. Make-up that’s improperly blended looks harsh and undefined.
Here are some key areas to blend:
- Foundation at hairline, jawline, and neck.
- Eyeliner and eyebrow pencil.
- Eyeshadow at crease and brow bone.
- Blush along apples of cheeks and upwards to cheekbones.
- Lip liner before applying lip color.
Step 4: Perfecting Make-Up
Face
Apply concealer with fingertips around entire eye, including lid and inner corner of nose; blend inward against fine lines.
Apply foundation with sponge in outward strokes at hairline, temples, forehead and entire eye area.
For remainder of face, apply in downward, sweeping strokes, blending out foundation all the way to neck area.
Allow foundation to dry slightly and finish with a dusting of translucent powder over entire face and neck area.
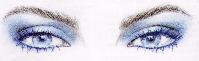
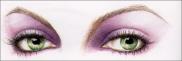
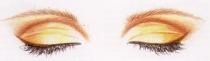
Eyes
Using sponge tip applicator or angled brow brush, fill in brow with brown powder, then groom and set brows with brush.
Apply one base color of shadow over entire lid.
Use a darker shade in crease and as an eyeliner, blend out with applicator.
Finish with mascara by holding wand horizontally.
Look straight ahead as you apply at base of lashes working outward, emphasizing outer lashes.
For lower lashes, stroke wand tip across lash line.
Blush
Smile as you apply blush to apples of cheeks with a big brush in a circular motion.
Blend outward with brush along cheekbones.
Lips
Outline lips with high definition liner.
Blend out pencil line and fill in lips by applying lip color with brush.
"It really does come down to everybody working together and trying to make the girl feel beautiful. My role is to make her feel the
most comfortable she can be. Because if she's not, the picture is not going to work. I don't like transforming girls into something
else. Make-up should be an enhancer, not a transformer. Sometimes my job is all about understanding what not to
do. If we're on the beach, I might get paid to say a model doesn't need anything on her face. It's all about maintaining the quality
of the girl. If you leave the skin real, she stays real."